Introducing a vibrant culinary adventure: our “How to Make No-Salt Kimchi Recipe.” Kimchi, the beloved Korean side dish, typically embraces salt as a key ingredient for fermentation and preservation. However, in response to dietary preferences and health considerations, we’re about to embark on a journey to create a no-salt kimchi that retains all the tangy, spicy flavors and probiotic goodness without the sodium concerns.
In this step-by-step guide, we’ll explore the art of crafting your own no-salt kimchi, perfect for those seeking a low-sodium alternative that’s as delicious as the original. You’ll learn about the ingredients, the fermentation process, and how to customize your no-salt kimchi to suit your taste. Get ready to experience the vibrant and wholesome world of kimchi with a healthier twist.
Table of Contents
ToggleUnderstanding No-Salt Kimchi
Traditional kimchi uses salt not only to draw moisture from the vegetables but also to control the fermentation process. Salt aids in the preservation of kimchi and contributes to its characteristic tangy flavor. However, for individuals watching their sodium intake or seeking a low-salt diet, no-salt kimchi offers a wonderful alternative. This recipe provides the same vibrant and spicy kimchi experience but with significantly reduced sodium content.
Ingredients
Before we dive into the step-by-step instructions, let’s gather the ingredients for your homemade no-salt kimchi:
- 1 Napa cabbage
- 1 small daikon radish
- 3-4 cloves of garlic
- 1 thumb-sized piece of ginger
- 2-3 green onions
- 1-2 tablespoons of Korean red pepper flakes (Gochugaru)
- 1 tablespoon of sugar
- 1 tablespoon of miso paste
- 1 tablespoon of fish sauce (optional, for an umami kick)
- 1-2 tablespoons of water (if needed)
- A clean glass jar with a tight-fitting lid
For More- Kosher Dill Pickle Recipe
Step-by-Step Instructions

Now, let’s get started with your no-salt kimchi:
Don't just scroll, subscribe!
BuzzTrail's unique web-stories are the cure for boredom you've been waiting for.
1. Prepare the Vegetables
- Begin by washing the Napa cabbage and daikon radish thoroughly. Then, cut the cabbage into bite-sized pieces and slice the radish into thin strips.
- Sprinkle the Napa cabbage and daikon radish with a small amount of salt, much less than you would use in traditional kimchi. Toss them together and let them sit for about an hour. This step helps soften the vegetables and initiates the moisture extraction process.
2. Prepare the Kimchi Paste

- While the vegetables are resting, let’s prepare the kimchi paste. In a blender or food processor, combine the garlic, ginger, green onions, Korean red pepper flakes (Gochugaru), sugar, miso paste, and fish sauce (if using).
- Blend until you have a smooth paste. If the mixture appears too thick, you can add a tablespoon or two of water to achieve the desired consistency.
3. Rinse and Drain
- After an hour, rinse the salted vegetables under cold running water to remove excess salt. Be sure to give them a good drain to remove any excess water.
4. Mix the Vegetables and Paste
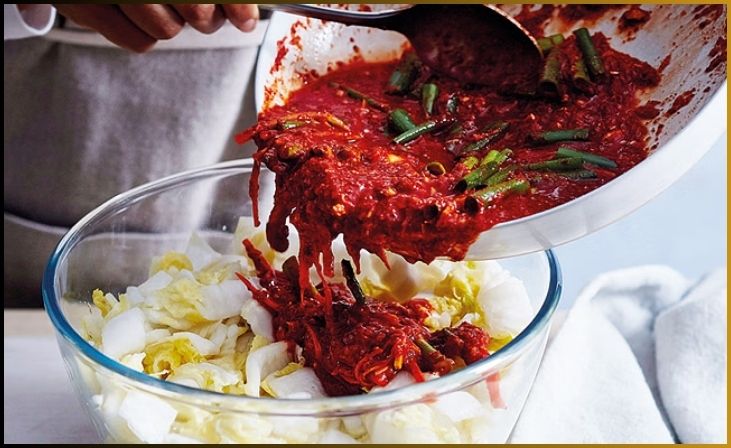
- In a large mixing bowl, combine the drained Napa cabbage, daikon radish, and the kimchi paste you’ve prepared.
- Use gloves to protect your hands from the spicy paste, and mix everything thoroughly. Make sure the vegetables are coated evenly with the paste.
5. Pack the Kimchi into a Jar

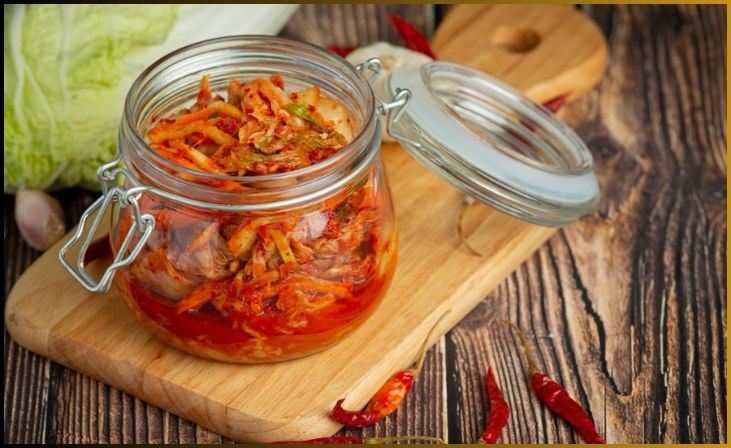
- Take your clean glass jar and start packing the kimchi mixture into it. Press it down firmly to minimize air gaps.
- Leave some space at the top of the jar as the kimchi will expand slightly during the fermentation process.
6. Fermentation
- Seal the jar with a tight-fitting lid and place it in a cool, dark place. Let the kimchi ferment for 1-2 days. Keep an eye on it; you will see small bubbles forming, and it will develop its characteristic tangy taste.
7. Taste and Store
- After 1-2 days, taste your no-salt kimchi to determine if it has reached the desired level of fermentation. If it’s to your liking, move the jar to the refrigerator to slow down the fermentation process.
- Your no-salt kimchi can be stored in the fridge for several weeks to enhance its flavor.
Benefits of No-Salt Kimchi
No-salt kimchi offers a range of benefits, making it an excellent choice for those looking to reduce their sodium intake while still enjoying the bold flavors and health advantages of traditional kimchi:
- Probiotics: Like its saltier counterpart, no-salt kimchi undergoes fermentation, leading to the development of probiotics. These beneficial bacteria support digestive health and contribute to a well-balanced gut microbiome.
- Rich Flavor: No-salt kimchi maintains the signature tangy and spicy taste of traditional kimchi. The combination of ingredients such as garlic, ginger, and Korean red pepper flakes ensures a flavorful and vibrant culinary experience.
- Low-Sodium: With significantly reduced sodium content, no-salt kimchi is a heart-healthy option for individuals following low-sodium diets. It allows them to relish the delightful flavors of kimchi without compromising their health.
Customizing Your No-Salt Kimchi

Customizing your no-salt kimchi allows you to tailor this delightful dish to your preferences. Here are some ways to make it your own:
- Additional Vegetables: Expanding the variety of vegetables in your no-salt kimchi adds depth and diversity to this classic Korean dish. While Napa cabbage and daikon radish are traditional choices, consider incorporating other vegetables like carrots for a touch of sweetness, bok choy for a crisp texture, or cucumbers for a refreshing twist. These additions not only introduce new flavors and textures but also contribute to the nutritional richness of your kimchi. Customizing the vegetable mix allows you to create a no-salt kimchi that aligns with your personal taste and dietary preferences, making it a truly unique and exciting culinary creation.
- Spiciness Level: Controlling the spiciness level in your no-salt kimchi is all about the amount of Korean red pepper flakes (Gochugaru) you use. If you’re a heat enthusiast, feel free to add more for an extra kick. On the other hand, if you prefer a milder flavor, simply reduce the quantity of red pepper flakes. This customization lets you fine-tune the spiciness to suit your taste buds, ensuring your no-salt kimchi is just the right level of fiery for your palate. Whether you like it blazing or mild, this adjustability allows you to enjoy a personalized kimchi experience every time you prepare it.
- Seasonings: Seasonings play a pivotal role in customizing the flavor of your no-salt kimchi. Beyond the traditional ingredients, you can experiment with seasonings like sesame seeds for a subtle nutty taste, seaweed flakes to infuse umami notes, or a touch of honey to add sweetness. These creative additions not only enhance the complexity of your kimchi’s taste but also allow you to craft a unique flavor profile that matches your preferences. By exploring different seasonings, you can transform your no-salt kimchi into a personalized culinary masterpiece, adding depth and character to each batch you create.
- Fermentation Time: The fermentation time of your no-salt kimchi directly influences its tanginess. By extending the fermentation period, you can achieve a more pronounced sour flavor. Conversely, if you prefer a milder taste, you can reduce the fermentation time. Monitoring this timing allows you to customize the kimchi’s tanginess to your liking, ensuring that every batch aligns perfectly with your palate. It’s a simple adjustment that empowers you to enjoy your no-salt kimchi just the way you prefer it.
- Fish Sauce or Vegan Options: When making your no-salt kimchi, you have the flexibility to choose between traditional fish sauce for its umami richness or opt for vegan alternatives like soy sauce or miso paste. This decision caters to personal taste and dietary preferences, ensuring your kimchi is a perfect fit for your lifestyle. Whether you’re embracing the depth of fish sauce or exploring vegan options, your no-salt kimchi can be customized to align with your culinary choices, making it both delicious and suitable for your needs.
For More- Easy Bread and Butter Pickle Recipe
Conclusion
In conclusion, our “How to Make No-Salt Kimchi Recipe” offers a delightful alternative for those looking to enjoy the vibrant flavors and probiotic benefits of kimchi while reducing their sodium intake. This heart-healthy twist on the Korean classic ensures you can savor the spicy, tangy goodness of kimchi without worrying about the salt content. The step-by-step guide empowers you to customize your no-salt kimchi to suit your preferences, from spiciness level to additional vegetables and seasonings.
Crafting your no-salt kimchi is not only a culinary adventure but also a health-conscious choice that brings the bold and probiotic-rich flavors of traditional kimchi to your table. Make it your own and enjoy the vibrant world of kimchi in a way that’s uniquely tailored to your taste.
FAQs
Can I use low-sodium soy sauce as a substitute for fish sauce in no-salt kimchi?
Can I use low-sodium soy sauce as a substitute for fish sauce in no-salt kimchi?
Yes, you can use low-sodium soy sauce as a vegan alternative to fish sauce in your no-salt kimchi.
How long does no-salt kimchi last in the refrigerator?
How long does no-salt kimchi last in the refrigerator?
No-salt kimchi can last for several weeks when stored in the refrigerator, developing its flavor over time.
Is no-salt kimchi as probiotic-rich as traditional kimchi?
Is no-salt kimchi as probiotic-rich as traditional kimchi?
No-salt kimchi still contains probiotics, but the fermentation process may be milder, resulting in slightly fewer probiotics than traditional kimchi.
Can I adjust the sweetness level in no-salt kimchi?
Can I adjust the sweetness level in no-salt kimchi?
Absolutely, you can increase or decrease the sugar content to adjust the sweetness to your preference.

