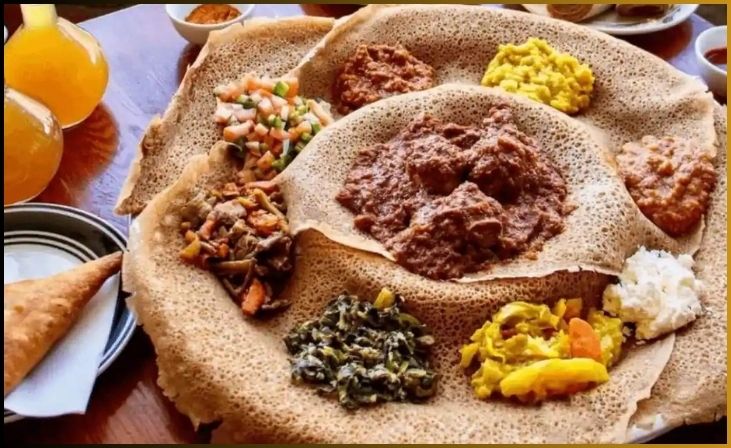
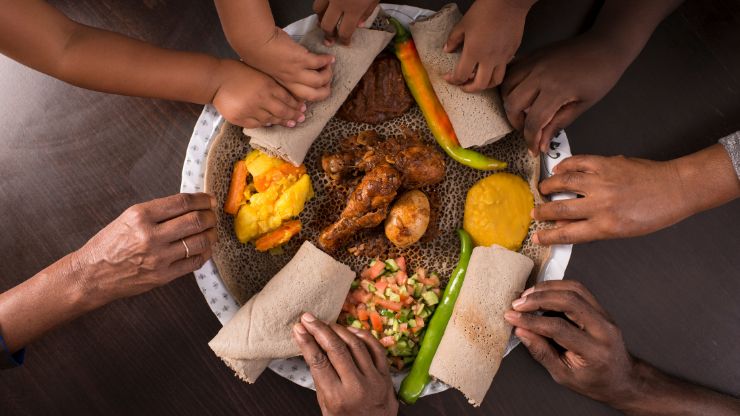
Ethiopia’s culinary heritage is a mosaic of flavors, and at its core lies injera, a remarkable and beloved Injera flatbread. Injera isn’t just bread; it’s an experience, a connection to a vibrant culture, and a journey into unique and diverse tastes. Making traditional Ethiopian injera at home is more than a cooking endeavor; it’s a chance to delve into the heart of Ethiopian cuisine.
This blog is your comprehensive guide to crafting injera, complete with the history, significance, and step-by-step instructions to create this iconic flatbread in your own kitchen. From the essential role of teff to the captivating fermentation process, we’ll unveil the secrets that make injera so special. So, whether you’re a culinary explorer or simply looking to expand your horizons, join us on this voyage into the heart of Ethiopian cuisine. Discover how to create injera, the soul of Ethiopian meals, and bring a taste of this remarkable culture to your home kitchen.
Table of Contents
ToggleThe Essence of Injera

Injera is not merely bread; it is an intrinsic part of Ethiopian culture and cuisine. This spongy, slightly sour flatbread acts as the centerpiece of an Ethiopian meal. It’s not just a vessel for food; it’s an integral part of the dining experience, a medium for exploring the array of vibrant flavors that Ethiopian cuisine offers.
Injera is used to scoop up various stews and sauces, such as doro wat (spicy chicken stew), kitfo (minced raw meat), or shiro (a thick stew made from legumes). Its tangy taste and unique texture enhance the dining experience, making it a culinary adventure on its own. But injera doesn’t just serve as a flavorful accompaniment; it’s also a utensil. Injera is traditionally used to pinch and scoop the dishes, eliminating the need for forks and spoons. This tactile and communal aspect of Ethiopian dining makes injera not only a food but also a cultural and social symbol.
For More- Healthy Sourdough Starter: The Heart of Artisanal Bread
Teff: The Heart of Injera
The primary ingredient in injera is teff, a tiny grain that is native to Ethiopia. Teff is gluten-free and is incredibly nutritious, making it an excellent choice for bread. This ancient grain is known for its versatility and nutritional value.
Teff grains come in different colors, including brown and ivory. While brown teff is more commonly used for making injera, ivory teff can also be used for a milder flavor. Teff is a nutritional powerhouse, rich in iron, calcium, and other essential minerals, and it is an excellent source of dietary fiber.
Don't just scroll, subscribe!
BuzzTrail's unique web-stories are the cure for boredom you've been waiting for.
The Fermentation Process
One of the distinguishing features of injera is its unique flavor and spongy texture. This is achieved through the fermentation process. Injera is made by mixing teff flour with water to create a batter, which is then allowed to ferment for several days. During this fermentation, wild yeast and lactic acid bacteria develop, giving injera its characteristic sour taste.
This natural fermentation also results in the creation of small bubbles throughout the injera. These bubbles contribute to the spongy texture that makes injera perfect for soaking up the flavors of Ethiopian stews and sauces.
Ingredients for Injera
To make traditional Ethiopian injera, you will need the following ingredients:
- 2 cups of teff flour (brown or ivory)
- 1 cup of self-rising flour (optional, for a lighter texture)
- 3 cups of warm water
- 1/2 teaspoon of dry active yeast (optional, for faster fermentation)
- 1/2 teaspoon of salt
- Cooking oil (for greasing the pan)
Step-by-Step Guide to Making Injera
Now, let’s dive into the process of making authentic injera flatbread. This traditional recipe yields approximately eight to ten injera, depending on the size of your pan.
Step 1: Fermentation Starter (Sourdough)
- Begin by mixing 1 cup of teff flour with 1 cup of warm water to create a thick paste.
- Cover the mixture and let it sit at room temperature for 2-3 days to ferment. This is your sourdough starter.
Step 2: Prepare the Batter
- In a large mixing bowl, combine the remaining teff flour and self-rising flour (if using).
- Gradually add the remaining 2 cups of warm water and stir until you have a smooth, lump-free batter.
- Add the fermented sourdough starter and continue to mix.
Step 3: Allow Fermentation
- Cover the bowl with a clean cloth or plastic wrap and let the batter ferment at room temperature for 2-3 days. During this fermentation period, the batter will become bubbly and slightly tangy. It will develop its signature sour taste and spongy texture.
Step 4: Adjust the Batter
- After the fermentation period, you may need to adjust the batter’s consistency. It should be thinner than pancake batter but thicker than crepe batter.
- Add water or teff flour as needed to achieve the right consistency. Stir well to incorporate.
Step 5: Add Salt
- Stir in the salt, which enhances the flavor of the injera. Mix thoroughly.
Step 6: Heat the Pan
- Place a non-stick skillet or a special injera pan (called a mitad) over medium heat. Let it become hot.
Step 7: Grease the Pan
- Lightly grease the pan with a small amount of cooking oil to prevent sticking.
Step 8: Pour and Cook
- Pour a ladleful of the batter onto the hot pan, starting from the outside and moving inward in a circular motion.
- The batter will sizzle and create bubbles on the surface.
Step 9: Cover and Cook
- Cover the pan with a lid to trap the steam and allow the injera to cook through without flipping it.
- Cooking time will vary but typically takes about 2-3 minutes. The injera is done when the edges start to pull away from the pan, and the surface appears dry.
Step 10: Remove and Serve
- Carefully remove the injera from the pan using a spatula.
- Let it cool briefly and stack it on a plate.
Tips for Making Perfect Injera
- Consistency is Key: Achieving the right consistency of the batter is crucial. It should be pourable but not too thin. Adjust it as needed.
- Patience: Give the batter ample time to ferment. This not only imparts flavor but also helps create the spongy texture.
- The First Injera: The first injera in the batch is often considered the chef’s treat. It might not be as perfect as the subsequent ones but is equally delicious.
- Stacking: When you remove the injera from the pan, stack them on top of each other. This helps to keep them soft and pliable.
- Enjoy Warm: Injera is best enjoyed fresh and warm, so serve it immediately.
Also Read- How to Make Fail-Proof Sourdough Pie Crust
Conclusion
As we conclude our culinary journey into the heart of traditional Ethiopian cuisine, making injera at home is not just a cooking task; it’s an immersion into the vibrant and diverse flavors of Ethiopia. Injera, the spongy and slightly sour flatbread, plays a central role in Ethiopian meals, both as a flavorful base and a cultural emblem. By following the steps in this guide, you’ve embarked on a journey that connects you to a rich culinary heritage, offering you the opportunity to savor the tastes of this remarkable culture.
FAQs
Can I make injera without teff flour?
Can I make injera without teff flour?
Teff flour is the traditional choice, but you can use a mixture of teff and other gluten-free flours, like rice or sorghum, as alternatives.
Why does my injera taste sour?
Why does my injera taste sour?
The sourness comes from the fermentation process, which is essential for injera’s characteristic flavor. If it’s too sour, you can reduce the fermentation time.
Can I make injera without a mitad (injera pan)?
Can I make injera without a mitad (injera pan)?
Yes, you can use a non-stick skillet or griddle as a substitute for the traditional mitad.

