Preserved lemons, with their uniquely intense flavor and versatility in the kitchen, have been a treasured ingredient in Middle Eastern and North African cuisine for centuries. These citrus gems add a burst of tanginess, depth, and complexity to a wide range of dishes, from tagines to salads. While traditionally made with salt and time, preserved lemons are surprisingly easy to create at home, and the process is nothing short of magical.
In this comprehensive guide, we will take you on a journey to master the art of making salted preserved lemons. From understanding the history and cultural significance to detailed step-by-step instructions, we’ll unveil the secrets behind this ancient culinary tradition. So, grab your lemons and let’s embark on a flavorful adventure.
Table of Contents
ToggleThe Allure of Preserved Lemons
Preserved lemons are a staple in many cuisines, particularly in Moroccan and Middle Eastern dishes. These small, intensely flavored lemons can transform a simple meal into a culinary masterpiece. But what makes preserved lemons so special?
1. Intense Lemon Flavor: Preserved lemons have a concentrated lemon flavor that’s both tangy and slightly sweet, with a unique depth and complexity that fresh lemons can’t replicate.
2. Versatile Ingredient: They’re incredibly versatile, enhancing the taste of a wide variety of dishes, from stews and tagines to salads, sauces, and marinades.
3. Easy to Make: Despite their gourmet appeal, making preserved lemons at home is straightforward and requires only a few simple ingredients.
4. Long Shelf Life: Once prepared, preserved lemons have a long shelf life, making them a practical addition to your pantry.
Also Read- Kosher Dill Pickle Recipe
A Glimpse into History
The practice of preserving lemons is ancient, with roots stretching back to the Mediterranean region. It was a practical way to preserve the harvest and add flavor to meals during the long, hot summer months when fresh produce was scarce.
Moroccan Tradition: In Moroccan cuisine, preserved lemons are often used in tagines, a slow-cooked stew characterized by the combination of sweet and savory flavors. The tartness of preserved lemons beautifully balances the richness of tagine dishes.
Middle Eastern Influence: In Middle Eastern cuisine, preserved lemons find their place in a wide range of dishes, from rice and couscous to salads and sauces. Their zesty character adds a refreshing and unique twist to various recipes.
Ingredients for Salted Preserved Lemons
To create this culinary gem, you’ll need the following ingredients:
- 4-6 fresh, organic lemons (look for thin-skinned varieties)
- Kosher salt (or any non-iodized salt)
- A clean, sterilized jar with a tight-fitting lid
Step-by-Step Guide to Making Salted Preserved Lemons
Now, let’s dive into the exciting process of making your own salted preserved lemons:
1. Lemon Selection

Selecting the right lemons is a crucial step in making salted preserved lemons. When choosing lemons, opt for fresh, organic ones. Thin-skinned lemon varieties work best for preserving, as their peels become soft and flavorful during the preservation process. Before you begin, ensure that the lemons are washed and thoroughly dried.
The quality of the lemons you select will significantly impact the overall flavor and texture of your preserved lemons, so it’s worth investing in the best lemons you can find. By starting with quality ingredients, you set the stage for a delicious and successful preservation process.
2. Prepare the Lemons
Preparing the lemons is a crucial step in the process of making salted preserved lemons. To do this, begin by placing the lemons on a clean cutting board. Start by trimming a thin slice from the top of each lemon. This not only removes the stem but also provides a flat surface for the next step. Next, make two perpendicular cuts into the lemon, stopping just short of cutting it into quarters but leaving it attached at the base.
This method, often referred to as “butterflying” the lemons, allows them to open up like a flower while preserving their structure. The cuts you make enable the lemons to absorb the salt and release their juices during the preservation process, infusing them with flavor and making them a culinary delight once fully preserved. Properly prepared lemons are the foundation of successful salted preserved lemons.
3. Salt the Lemons

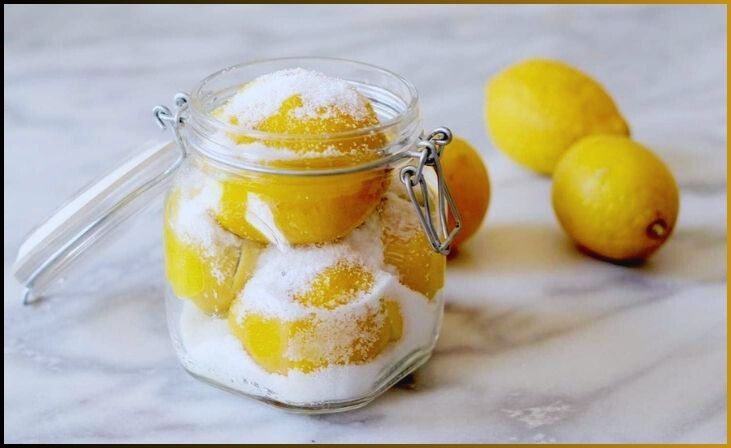
Salting the lemons is a crucial step in creating salted preserved lemons. After the lemons have been prepared by making the cuts without separating the quarters, it’s time to generously sprinkle salt inside the cut lemons. The salt serves multiple purposes in this process. Firstly, it initiates the preservation process, drawing moisture from the lemons and helping to soften their texture.
Secondly, the salt infuses the lemons with a delightful salty tang, which, when combined with the citrusy zest, creates the unique flavor that makes preserved lemons so distinctive. It’s essential to ensure that the lemons are well-coated with salt during this stage. This generous salting of the lemons is the first step in the transformation of ordinary lemons into a culinary delight that will enhance a wide range of dishes.
Don't just scroll, subscribe!
BuzzTrail's unique web-stories are the cure for boredom you've been waiting for.
4. Pack the Lemons
Packing the lemons into the sterilized jar is a pivotal step in the process of making salted preserved lemons. After the lemons have been properly salted, they are tightly placed into a sterilized glass jar. As you pack them in, gently press down to extract juice from the lemons. This juice combines with the salt, creating a brine that submerges the lemons. It’s crucial to pack the lemons tightly and ensure they are fully immersed in the brine.
The combination of salt, lemon juice, and time will work together to soften the lemons and infuse them with a delightful, intensely tangy flavor. Properly packing the lemons guarantees that they are preserved evenly and thoroughly, resulting in a jar of salted preserved lemons that are both delicious and ready to elevate your culinary creations.
5. Store and Wait
After the lemons have been properly packed into the sterilized jar, the next step is to seal the jar tightly and store it in a cool, dark place. This marks the beginning of the waiting period in the salted preserved lemons-making process. Over the next few days, the lemons will release more juice, and the salt will continue to draw moisture from the fruit. As this happens, the lemons will begin to soften, and their texture will gradually change.
The cool, dark storage environment provides the ideal conditions for the preservation process to take place. It’s during this time that the salted preserved lemons will transform from ordinary citrus fruits into the intensely flavored and versatile ingredient that will enhance a variety of dishes in your culinary adventures. The waiting period is where the magic of preservation occurs, so patience is key in this phase of the process.
6. Shake and Wait Some More
During the waiting period in the salted preserved lemons-making process, it’s essential to engage in a little activity – shaking the jar gently and waiting some more. Every few days, it’s a good practice to take the sealed jar and give it a gentle shake. This serves two important purposes.
Firstly, the shaking helps redistribute the salt within the jar, ensuring that all lemons receive an even amount of salt. This even distribution of salt is crucial for the proper preservation and flavor infusion.
Secondly, shaking the jar allows you to monitor the progress of the lemons. Over time, the lemons will continue to release juice and soften. By shaking the jar periodically, you can assess their texture and adjust the preservation time as needed.
7. Use Your Preserved Lemons

After patiently waiting for the salted preserved lemons to complete their transformation, they are now ready for culinary adventures. To use your preserved lemons, remove them from the jar and give them a rinse under cold water. This helps remove excess salt, as they can be quite salty after the preservation process.
Once rinsed, you can employ these flavorful gems in a myriad of dishes. Their concentrated lemon flavor and unique tanginess make them a versatile addition to your cooking. Chop or dice the lemons, and add them to Moroccan tagines for an authentic twist, toss them into salads for a zesty burst of flavor, incorporate them into sauces and marinades, or even use them to season rice, couscous, and grain dishes. The possibilities are endless, and their delightful flavor can elevate even the simplest of meals to a gourmet experience.
Salted preserved lemons are a culinary treasure that adds depth, complexity, and a burst of citrusy tang to your recipes, ensuring your dishes stand out with their unique and vibrant flavor.
For More- How to Make No-Salt Kimchi Recipe
Culinary Applications
The uses for preserved lemons are virtually limitless. Here are a few ideas to get you started:
1. Moroccan Tagines: Preserved lemons are a key ingredient in traditional Moroccan tagines. The citrusy tang they bring balances the flavors of rich stews.
2. Salads: Add chopped preserved lemon to your salads for a refreshing burst of flavor.
3. Sauces and Marinades: Incorporate them into sauces and marinades for a unique twist on your favorite dishes.
4. Rice and Grain Dishes: Season rice, couscous, or quinoa with the zest of preserved lemons for added depth.
5. Roasted Vegetables: Roast vegetables with a touch of chopped preserved lemon for a delicious side dish.
Bottom Line
The art of making salted preserved lemons is a delightful culinary journey that transforms ordinary citrus into a versatile and intensely flavored ingredient. With just a few simple steps, you can create a jar of these tangy gems that will elevate your dishes to new heights. Whether you’re crafting Moroccan tagines, brightening up your salads, experimenting with new recipes, or simply seeking to add a touch of citrusy magic to your cooking, preserved lemons are a fantastic addition to your culinary repertoire. Their unique flavor and versatility make them a must-have in any kitchen. So, get started and enjoy the vibrant and flavorful world of salted preserved lemons.
FAQs
Can I use regular lemons instead of thin-skinned ones for preserved lemons?
Can I use regular lemons instead of thin-skinned ones for preserved lemons?
While thin-skinned lemons are ideal, regular lemons can be used, but they might have a thicker peel.
How long do salted preserved lemons last in the refrigerator?
How long do salted preserved lemons last in the refrigerator?
Properly stored, salted preserved lemons can last for up to six months.
Can I adjust the level of saltiness in preserved lemons?
Can I adjust the level of saltiness in preserved lemons?
Yes, you can control the saltiness by rinsing the preserved lemons more thoroughly or using less salt during the initial preparation.
Are there any vegan alternatives to salted preserved lemons?
Are there any vegan alternatives to salted preserved lemons?
For a vegan version, you can make preserved limes using the same method, replacing lemons with limes.

