
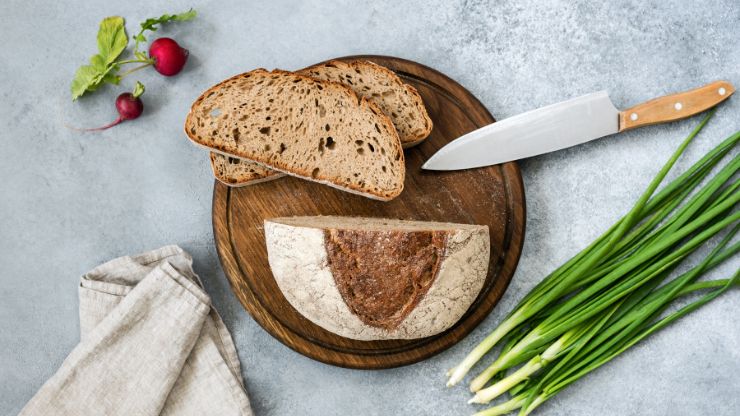
Imagine the inviting aroma of freshly baked bread filling your kitchen, and then add to that the irresistible scent of melted cheese. That’s the delightful experience we’re diving into with our Cheesy Whole-Wheat Sourdough Bread. This bread combines the wholesome goodness of whole wheat with the rich, savory tang of sourdough and the gooey deliciousness of cheese.
It’s a culinary adventure that results in a loaf with a hearty crust, a tender crumb, and pockets of molten cheese, perfect for savoring fresh from the oven or as a complement to your favorite dishes. In this blog, we’ll walk you through the steps of crafting this cheesy masterpiece, from preparing your sourdough starter to incorporating the cheese and achieving that perfect bake. Get ready to embark on a bread-baking journey that will fill your home with warmth and your taste buds with delight.
The Art of Blending Cheese and Whole Wheat

The creation of Cheesy Whole-Wheat Sourdough Bread is an artful fusion of flavors and textures. It’s a culinary endeavor that brings together the distinct tanginess of sourdough and the creamy richness of cheese, resulting in a bread that’s not just a source of comfort but a delightful indulgence for the palate.
At the heart of this artful blend is the choice of cheese, where you have the freedom to select the variety that best complements your taste preferences. Whether it’s the sharpness of cheddar, the nuttiness of Gruyère, or the creaminess of mozzarella, each cheese adds its unique character to the bread, creating a symphony of flavors.
Whole wheat, the other key player in this culinary masterpiece, contributes a rich, earthy depth to the bread. It’s a whole grain that retains the bran, germ, and endosperm, making it a nutritional powerhouse. Whole wheat brings its distinct nutty taste and robust texture to the bread, making every bite a wholesome experience.
For More- A Tasty Sourdough Bannock Bread Recipe
The Nutritional Power of Whole Wheat
Whole wheat is a nutritional powerhouse, and when it takes center stage in Cheesy Whole-Wheat Sourdough Bread, it adds a layer of wholesome goodness to this indulgent delight.
- High in Fiber: Whole wheat is celebrated for its rich fiber content. It contains both soluble and insoluble fibers, which play pivotal roles in promoting digestive health. Soluble fiber helps in lowering “bad” LDL cholesterol levels, reducing the risk of heart disease. On the other hand, insoluble fiber adds bulk to the stool, supporting regular bowel movements and preventing constipation.
- Blood Sugar Control: Whole wheat has a lower glycemic index compared to refined grains. Foods with a lower glycemic index lead to a slower and more gradual increase in blood sugar levels. This makes whole wheat an excellent choice for individuals looking to manage their blood sugar effectively, including those with diabetes.
- Weight Management: The fiber in whole wheat provides a sense of fullness and satiety, reducing overall calorie intake. It’s a valuable ally for weight management, helping to control appetite and prevent overeating.
- Nutrient-Rich: Whole wheat is not just about fiber; it’s also packed with essential nutrients. It’s a great source of B vitamins, such as thiamin, niacin, and folate, which are crucial for energy metabolism. Additionally, it offers essential minerals like magnesium, iron, and zinc, contributing to various bodily functions. Whole wheat is also rich in antioxidants that combat oxidative stress, supporting overall health and a robust immune system.
- Digestive Health: The combination of soluble and insoluble fiber in whole wheat supports digestive health. Soluble fiber fosters beneficial gut bacteria, promoting a healthy gut microbiome. A well-balanced gut contributes to digestion, nutrient absorption, and a robust immune system.
The Magic of Sourdough
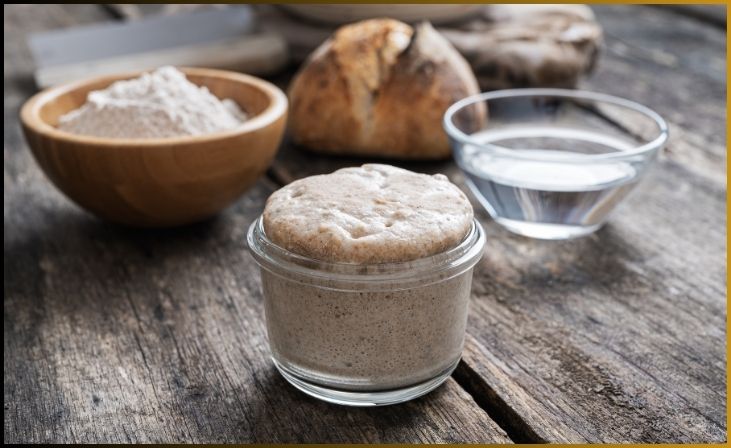
The magic of Cheesy Whole-Wheat Sourdough Bread lies not only in the harmonious blend of cheese and whole wheat but also in the enchanting world of sourdough. Sourdough is not just a leavening agent; it’s a living ecosystem, a dynamic mixture of wild yeast and lactic acid bacteria, known as a sourdough starter.
Here’s a glimpse into the captivating realm of sourdough:
1. A Living Culture: A sourdough starter is a living culture of wild yeast and bacteria that naturally occurs in the environment. This mixture ferments the bread, creating the characteristic tangy flavor and providing leavening action.
2. Fermentation: The true magic of sourdough happens during fermentation. When the sourdough starter is combined with flour and water, the wild yeast consumes the carbohydrates in the flour, producing carbon dioxide gas. This gas gets trapped in the dough, causing it to rise, resulting in the airy, hole-studded crumb that’s a hallmark of sourdough bread.
3. Flavor Development: Sourdough’s long fermentation process allows for the development of complex flavors. The byproducts of yeast and bacteria fermentation contribute to the distinct tangy taste that sourdough is famous for. This unique flavor profile is what sets sourdough apart from other bread types.
4. Natural Leavening: Sourdough is a natural leavening agent, making it an excellent choice for those who prefer to avoid commercial yeast. The wild yeast in the starter provides a slow and steady rise, resulting in a chewy, well-structured loaf.
5. Digestibility: The fermentation process of sourdough partially breaks down gluten and phytic acid, making the bread more digestible for some individuals who are sensitive to these components. This makes sourdough a favorable choice for those with mild gluten sensitivities.
Crafting Your Cheesy Whole-Wheat Sourdough Bread
Crafting your Cheesy Whole-Wheat Sourdough Bread is a delightful culinary adventure that combines traditional bread-making techniques with a creative twist. Here’s a step-by-step guide to help you create this mouthwatering masterpiece:
Ingredients:
- 1 cup active sourdough starter
- 1 ½ cups whole-wheat flour
- 1 ½ cups all-purpose flour
- 1 ½ cups warm water
- 1 ½ tsp salt
- 1 ½ cups grated cheese (choose your favorite variety)
- Optional: herbs, spices, or seeds for added flavor
Instructions:
Certainly, here are the instructions to create Cheesy Whole-Wheat Sourdough Bread.
- Prepare Your Starter: To prepare your sourdough starter, mix equal parts of flour and water in a clean container and let it sit at room temperature for 24 hours. The wild yeast in the environment will begin to ferment the mixture, creating a bubbly and active starter. This is the heart of your sourdough bread and should be maintained by regular feeding to keep it active and ready for baking.
- Mix the Flours and Water: In a large mixing bowl, combine the whole-wheat flour, all-purpose flour, and warm water. Stir until the mixture forms a shaggy dough. Cover the bowl with a clean kitchen towel and let it rest for 30 minutes. This resting period, known as autolyse, allows the flour to hydrate and the gluten to develop.
- Add the Sourdough Starter: After the initial mixing of flours and water, add your active sourdough starter to the dough. Knead it in thoroughly to ensure it’s well incorporated. This step introduces the distinctive tangy flavor and leavening power of sourdough to your bread, giving it its characteristic texture and taste. It’s a crucial moment in the bread-making process.
- Incorporate the Salt: Sprinkle the salt over the dough and knead it in thoroughly. Salt not only enhances the flavor of your Cheesy Whole-Wheat Sourdough Bread but also regulates the fermentation process. It helps control the rise and adds depth to the taste, ensuring a perfectly balanced and savory loaf.
- Folding and Fermentation: During the folding and fermentation stage, you’ll periodically fold the dough at intervals of 30 minutes. This process helps develop the gluten structure and distributes the cheese evenly. Over several hours, the dough undergoes a series of rises and falls, becoming more elastic and airy. This meticulous care in folding ensures a well-structured and flavorful Cheesy Whole-Wheat Sourdough Bread.
- Incorporate the Cheese: About 4 hours into the folding and fermentation process, when the dough has gained strength, gently fold in the grated cheese. This step adds a burst of savory goodness to your Cheesy Whole-Wheat Sourdough Bread. Whether you choose cheddar, mozzarella, or another favorite cheese variety, it will be evenly distributed throughout the dough, infusing each bite with rich, cheesy flavor.
- Shape the Loaf: After the final fold and fermentation period, allow the dough to rest for about 30 minutes. Then, shape it into a round or oval loaf. Ensure the cheese is evenly distributed throughout the dough to create a consistent flavor. This step sets the stage for the bread’s final rise and the development of a beautiful, crusty exterior during baking, resulting in your delicious Cheesy Whole-Wheat Sourdough Bread.
Also Read- Whole Wheat Brownie Sourdough Bread
Final Words
In the world of artisanal bread, our Cheesy Whole-Wheat Sourdough Bread stands as a testament to the fusion of wholesome ingredients and delicious flavors. Baking this cheesy delight is not just about the final product; it’s an experience that infuses your kitchen with irresistible aromas and your taste buds with satisfaction. From the tang of the sourdough to the cheesy pockets within the tender crumb, it’s a symphony of taste and texture. With this recipe, you’ve unlocked the secret to crafting a bread that’s both rustic and gourmet, ideal for sharing with loved ones or savoring on your own.
So, pick up your apron, preheat the oven, and create a fresh batch of this delectable bread. Share it at gatherings, or enjoy it in solitary moments—either way, it’s sure to leave a lasting impression.
FAQs
Absolutely! You can experiment with various cheese varieties like cheddar, mozzarella, gouda, or even a blend for a unique flavor twist.
To keep it fresh, store the bread in a paper bag or wrapped in a clean kitchen towel. Avoid airtight containers to prevent moisture buildup.
Yes, you can freeze slices of the bread in an airtight container for up to three months. Thaw and reheat as needed.
While the sourdough contributes to the bread’s distinctive flavor and texture, you can try substituting it with a pre-ferment or poolish for a similar effect.