
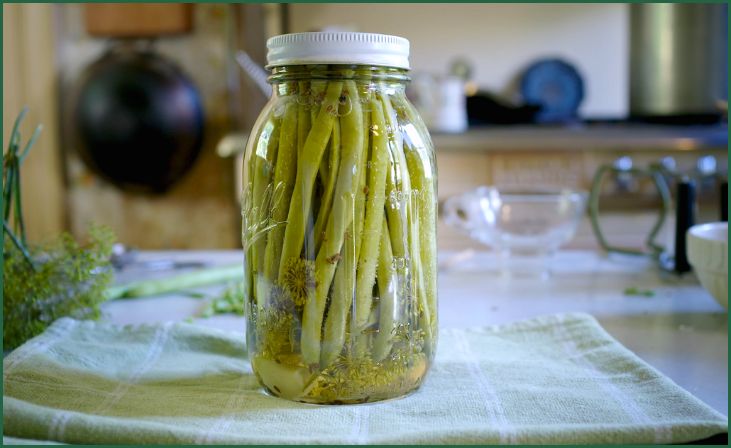
Fermented Dilly Beans for Lunchbox Treats – Welcome to the flavorful world of homemade fermented dilly beans! Elevate your lunchbox game with our valuable tips and tricks that promise to turn this crunchy snack into a lunchtime delight.
Whether you’re a seasoned fermenter or a novice in the kitchen, these insights will ensure your dilly beans are not just nutritious but bursting with tangy goodness. Let’s embark on a journey of pickling perfection and transform your lunchbox into a haven of wholesome joy.
10 Tips To Make Fermented Dilly Beans for Lunchbox Treats
Selecting the Right Beans:
Choosing the right beans is the cornerstone of a successful batch of fermented dilly beans. To ensure optimal results, opt for fresh, crisp, and young green beans with a vibrant color. Aim for beans that are approximately 4-6 inches in length, as this size guarantees a satisfying crunch even after the fermentation process. Before starting, give them a thorough rinse to eliminate any residual dirt, and trim the ends for a uniform appearance and texture in your final product.
Brine Basics:
The brine is a pivotal element in the alchemy of fermenting dilly beans. Crafting a simple yet effective brine is key. Utilize high-quality sea salt and water, maintaining a recommended ratio of 3 tablespoons of salt per quart of water. Ensure the salt dissolves completely before adding it to your jar, as this concentration acts as both a preservative and a facilitator for the proliferation of beneficial bacteria. The brine sets the stage for the tangy transformation of your beans.
Also Read: Sterilize your Fermenting Jars
Sterilize Your Equipment:
Before embarking on the fermentation process, meticulous sterilization of all equipment is paramount. Thoroughly clean jars, lids, and any utensils with hot, soapy water. This rigorous cleaning routine serves as a crucial preventive measure, thwarting the growth of unwanted bacteria that could potentially spoil your batch of dilly beans. A sterile environment is the canvas upon which your flavorful masterpiece will unfold.
Spice it Up:
Elevate the flavor profile of your fermented dilly beans by infusing a medley of spices. Dill seeds, garlic cloves, and red pepper flakes are tried-and-true favorites. Encourage experimentation with different spice combinations to discover the perfect blend that harmonizes with your taste buds. Keep in mind that spices not only contribute to the overall flavor but also introduce layers of complexity, turning your dilly beans into a symphony of tastes.
Mindful Packing:

The art of proper packing ensures an even and successful fermentation process. Pack the beans tightly into the jars, leaving enough headspace to accommodate the natural expansion that occurs during fermentation. This prevents any potential overflow and messy situations. Equally crucial is ensuring that the beans are fully submerged in the brine, minimizing exposure to air and facilitating an efficient fermentation environment.
Fermentation Time:
Embarking on the journey of fermenting dilly beans requires a significant dose of patience. The duration can vary based on personal preference, but a general guideline is 1 to 2 weeks. Throughout this period, regularly taste the beans to monitor their progress. The extended fermentation time results in beans with heightened tanginess and a more complex flavor profile. Let time be the secret ingredient in your culinary masterpiece.
Temperature Control:
Maintaining a consistent temperature is a key factor in the success of your fermentation process. Store your jars in a cool, dark place, steering clear of direct sunlight. Aim for a temperature range of 60-75°F (15-24°C), which provides an optimal environment for the growth of beneficial bacteria. Fluctuations in temperature can disrupt the fermentation process, so finding a stable environment for your jars is essential.
Burping the Jars:
To release built-up gases and prevent excessive pressure, adopt the practice of “burping” your jars every day during the fermentation period. This involves briefly opening the lid to allow gases to escape and then resealing the jar. This simple yet crucial step ensures a controlled fermentation process, mitigating the risk of potential jar explosions and promoting a safe and successful outcome.
Taste Testing:
As your dilly beans undergo the fermentation alchemy, their flavor profile undergoes a transformative journey. Regular tasting is essential to determine when they reach the desired level of tanginess. This hands-on approach allows you to tailor the flavor to your liking. Once satisfied, it’s time to transition the jars to the refrigerator, slowing down the fermentation process and locking in the perfected taste.
Storage and Enjoyment:
After achieving the pinnacle of fermentation perfection, store your dilly beans in the refrigerator. Their shelf life can extend for several months, with the flavor continuing to develop over time. Revel in the satisfaction of enjoying these tangy, crunchy delights straight from the jar or integrate them into your lunchbox treats, providing not only a burst of flavor but also an infusion of added nutritional benefits.
Also Read: Sterilize your Fermenting Jars
Creative Flavor Variations and Personalization
Fermented dilly beans are not just a culinary creation; they’re a canvas waiting to be painted with a spectrum of flavors. Elevate your pickling prowess by exploring creative flavor variations and infusing your dilly beans with a personalized touch. Here’s how you can turn this humble snack into a symphony of tastes:
- Citrus Zest Infusion: Add a zesty twist to your dilly beans by incorporating citrus zest into the mix. Lemon, lime, or orange zest introduces a burst of brightness, balancing the tanginess of the fermentation process. Experiment with different citrus fruits to discover your preferred flavor profile, creating dilly beans that dance on your taste buds.
- Savory Herb Symphony: Elevate the herbal notes in your dilly beans by experimenting with a variety of fresh herbs. Rosemary, thyme, or even basil can lend a savory complexity to the pickling process. The herb-infused dilly beans not only tantalize the taste buds but also add an aromatic dimension, making each bite a sensory experience.
- Sweet and Spicy Fusion: Strike a perfect balance between sweet and spicy by introducing ingredients like honey, maple syrup, or agave nectar into your brine. Pair these sweet elements with red pepper flakes or jalapeños to create a dynamic fusion of flavors. This sweet and spicy symphony transforms your dilly beans into a snack that surprises and delights with every bite.
- Smoky Mesquite Magic: Infuse a touch of smokiness into your dilly beans by experimenting with smoked paprika or mesquite seasoning. This flavor variation adds depth and complexity, reminiscent of a barbecue-infused treat. The smoky notes complement the tanginess of the brine, creating dilly beans that transport your palate to a savory culinary adventure.
- Garlic Lover’s Dream: For garlic enthusiasts, intensify the flavor by adding roasted garlic cloves to the brine. The slow-roasted cloves infuse a rich, mellow garlic essence, creating dilly beans that cater to the savory cravings of garlic lovers. This variation adds a robust depth to the overall flavor profile.
- Pickled Pepper Parade: Expand your dilly bean repertoire by introducing a medley of pickled peppers. From mild banana peppers to fiery serranos, the variety of peppers available allows you to tailor the spice level to your preference. This pickled pepper parade not only adds heat but also a spectrum of colors, making your dilly beans visually appealing.
- Cumin and Coriander Fusion: Transport your taste buds with a hint of exoticism by infusing cumin and coriander into your dilly bean brine. These warm, earthy spices add a layer of complexity, transforming your beans into a fusion of international flavors. Pair this variation with a squeeze of lime for an extra touch of brightness.
- Balsamic Elegance: Elevate the sophistication of your dilly beans by replacing a portion of the vinegar in the brine with balsamic vinegar. This adds a subtle sweetness and depth to the overall flavor profile, creating dilly beans that are as elegant as they are delicious. Perfect for those seeking a refined twist on a classic.
Remember, the beauty of crafting fermented dilly beans lies in the freedom to experiment and personalize. Embrace your inner culinary artist, mix and match flavors, and let your taste buds guide you on a flavorful journey. Whether you prefer a hint of sweetness, a kick of spice, or an herbal infusion, these creative variations allow you to curate dilly beans that reflect your unique palate. So, don your apron, gather your ingredients, and let the pickling adventure begin!
Also Read: Can You Ferment Different Foods in the Same Room?
Conclusion
There you have it – a crash course in creating the perfect fermented dilly beans for your lunchbox. Armed with our valuable tips, you’re now ready to impress your taste buds and elevate your midday meal. Embrace the art of pickling, and watch as your lunchbox becomes the envy of the office or classroom. Get creative, enjoy the process, and savor the satisfaction of crafting your own crunchy, tangy delights. Lunchtime will never be the same again!
FAQs
Fermented dilly beans aren’t just a tasty addition to your lunch; they’re a nutritional powerhouse. Packed with probiotics, they support gut health and provide a satisfying crunch. Say goodbye to bland snacks, and hello to a flavorful, health-boosting experience.
Absolutely! One of the beauties of making your own dilly beans is the ability to customize flavors. Experiment with garlic, dill, or even a hint of spice. Personalize your pickles to suit your taste buds and make every lunch a unique and delicious adventure.